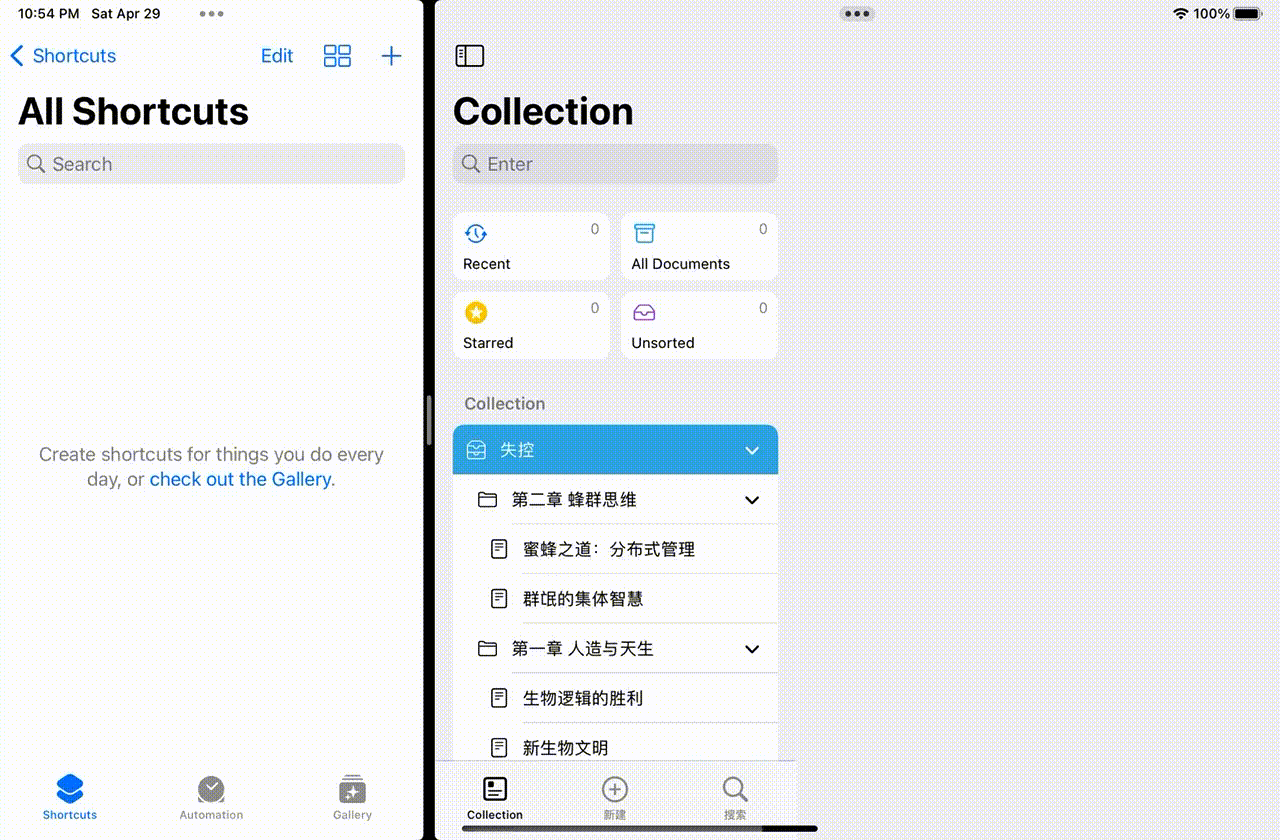
在 Classic Style 的 UISplitViewController 中,已有较为完善的方案实现在 UISplitViewController Master 页面嵌套 UITabBarController,并达成类似 ShortCut 应用在 Expand 和 Collapse 时自动调整视图堆栈的效果,但在 Column Style 的 UISplitViewController 中,这些方案由于 Apple 禁止将 Primary Column 设置为 UITabBarController 而无法实现。
本文基于经典风格的方案进行调整优化,以实现在 Column Style SplitViewController 中实现视图控制器堆栈自适应调整的自适应导航效果。
基于探索,UISplitViewController 无法在 Primary Column 使用 UITabBarController 的主要原因是 UINavigationController 的嵌套会造成崩溃,根据 Apple 的文档来看,UISplitViewController 会默认在非 UINavigationController 的 Primary Column 视图外嵌套一层 UINavigationController,而这造成了与 UITabBarController 的冲突。
在早期探索中,可以使用自定义 TabBarController 的方案来绕过限制,即自定义容器视图控制器,添加 UITabBar并实现代理。但是,如果在外层嵌套导航控制器,会导致导航栏无法对子视图控制器的行为产生响应(如大标题风格导航栏的折叠等),而在内层嵌套,即将子视图控制器包裹在导航控制器中,又会导致两层导航控制器的冲突(UISplitViewController 默认添加的和包裹子视图控制器的)。
本文采取了一种较为巧妙的方案,即子类化 UINavigationController,添加导航栏,并重写部分方法以达成 UITabBarController 的效果。
相关概念
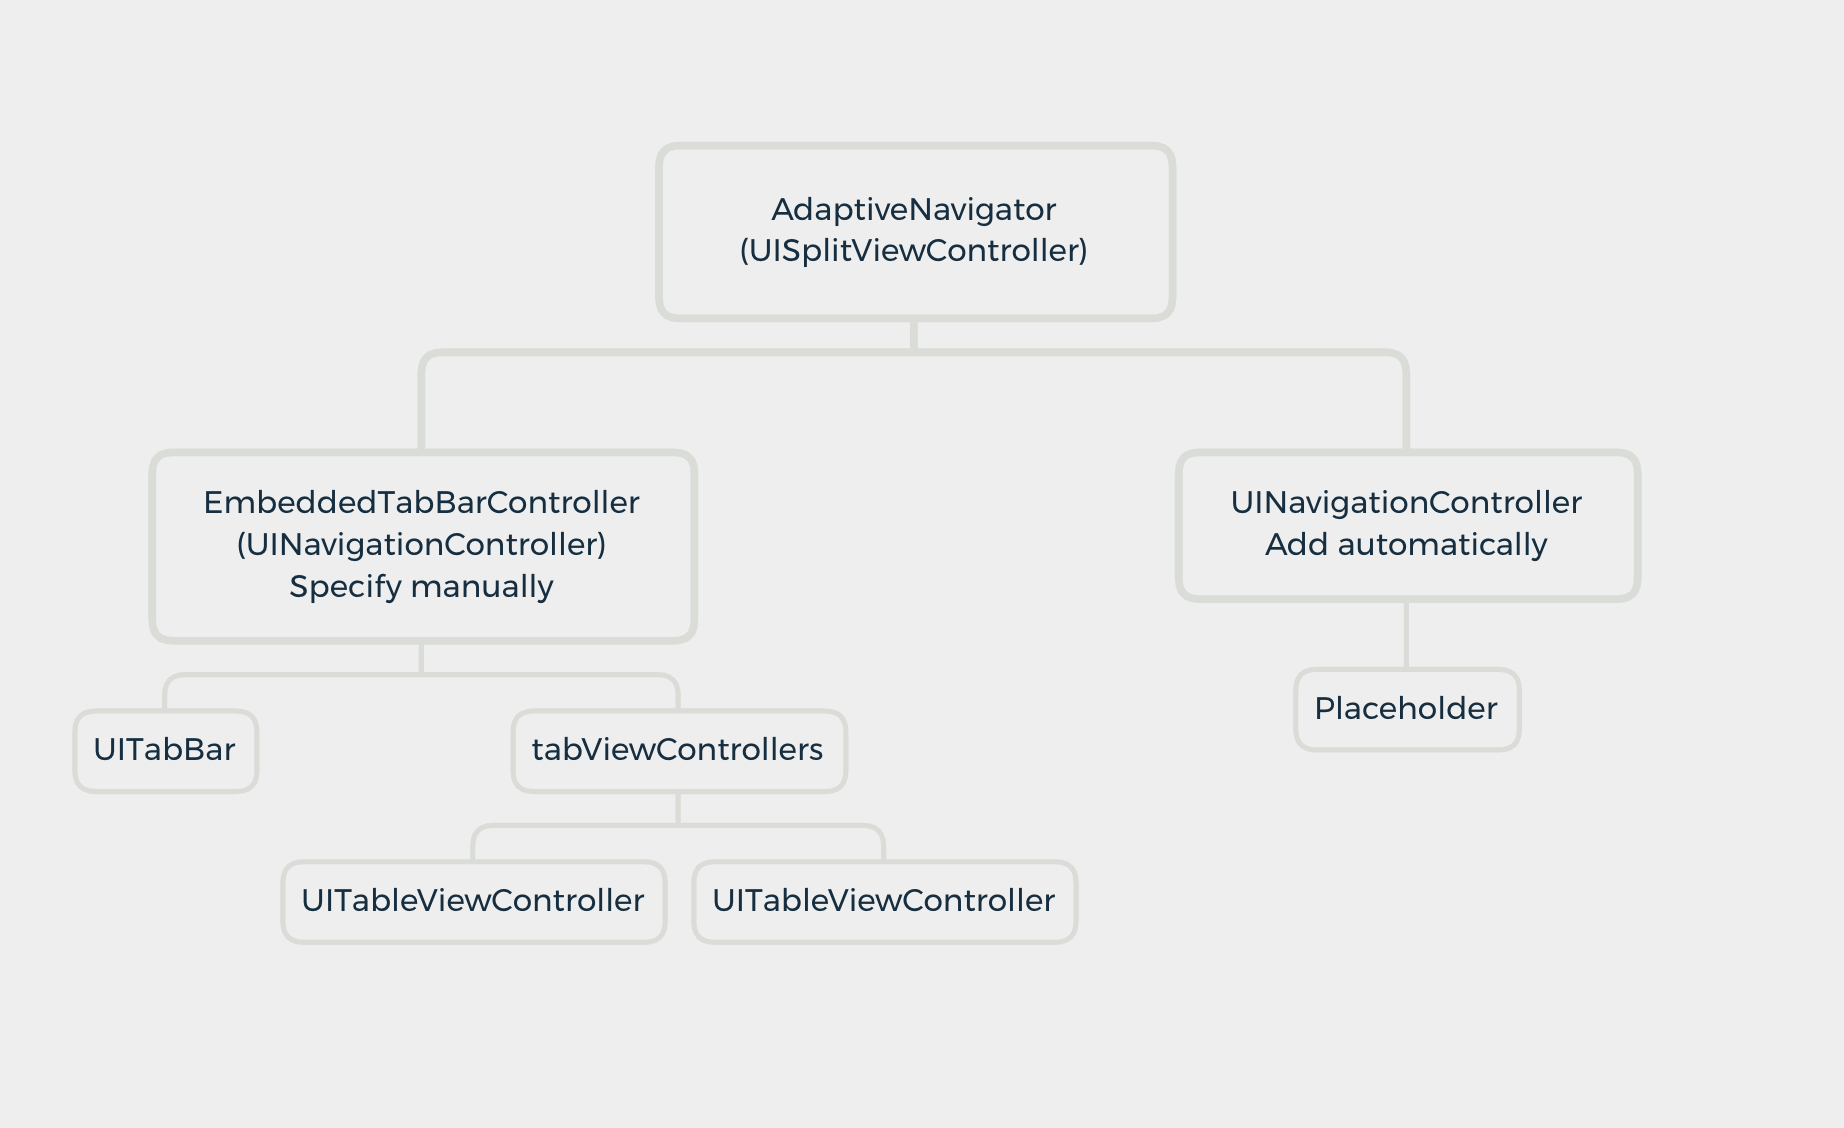
- 子类化 UISplitViewController 为 AdaptiveNavigator 以便重写相应方法
- Primary Column 为 EmbeddedTabBarController
- Secondary Column 为 自动添加的 UINavigationController
- 子类化 UINavigationController 为 EmbeddedTabBarController,并添加 UITabBar 视图和 tabViewControllers 属性
- 子类化 UIViewController,并设置为默认的 Secondary Column 视图,用来占位
具体实现
重写 showDetailViewController
 1
 2
 3
 4
 5
 6
 7
 8
 9
10
11
12
13
14
15
16
17
18
19
20
21
22
23
24
|
override func showDetailViewController(_ vc: UIViewController, sender: Any?) {
  if isCollapsed {
    guard
      viewControllers.count >= 1,
      let navController = viewControllers[0] as? EmbeddedTabBarController else { return }
    navController.rawPushViewController(vc, animated: true)

  } else {
    guard
      viewControllers.count >= 2,
      let primary = viewControllers[0] as? EmbeddedTabBarController,
      let navController = viewControllers[1] as? UINavigationController else { return }

    let isPlaceholderTop = navController.topViewController is Placeholder
    let isFromPrimary = (sender as? UIViewController) == (viewControllers[0] as? EmbeddedTabBarController)?.selectedViewController
      || (sender as? EmbeddedTabBarController === primary)

    if isFromPrimary {
      navController.popToRootViewController(animated: false)
    }

    navController.pushViewController(vc, animated: isPlaceholderTop || !isFromPrimary)
  }
}
|
我们可以通过 isCollapsed 属性来判断当前 UISplitViewController 的状态。
当状态为 Collapsed 时,我们调用 EmbeddedTabBarController 的 rawPushViewController 方法来推送视图(后文会介绍该方法);
当状态为 Expanded 时,我们判断当前 Secondary Column 是否仅有 Placeholder,以及发送 showDetailViewController 的实例是否来自于 Primary Column,以此来决定是否在推送时显示动画,最终调用 Secondary Column 的 UINavigationController 来推送视图。
默认情况下,Secondary Column 返回根视图时会取消 Primary Column 的选中项,我由于应用设计的原因在这里没有处理,如有需求可通过通知中心等传递消息以取消选中。
可以参考 https://nyrra33.com/2020/06/27/using-uisplitviewcontroller-with-uitabbarcontroller/ 的处理方法。
在布局变化时调整视图控制器堆栈
Collapse
 1
 2
 3
 4
 5
 6
 7
 8
 9
10
11
12
13
|
public func splitViewController(_ svc: UISplitViewController, topColumnForCollapsingToProposedTopColumn proposedTopColumn: UISplitViewController.Column) -> UISplitViewController.Column {
  guard
    svc.viewControllers.count >= 2,
    let primary = svc.viewControllers[0] as? EmbeddedTabBarController,
    let secondary = svc.viewControllers[1] as? UINavigationController
  else { return .primary }

  secondary.popToRootViewController(animated: false)?.forEach {
    primary.rawPushViewController($0, animated: false)
  }

  return .primary
}
|
我们可以通过 UISplitViewControllerDelegate 的上述代理方法来实现 Will Collapse 时,视图堆栈的调整。Secondary Column 的导航控制器逐个弹出,再逐个压入 EmbeddedTabBarController 中。
Expand
 1
 2
 3
 4
 5
 6
 7
 8
 9
10
11
12
13
14
15
16
17
18
19
20
21
22
23
|
public func splitViewController(_ svc: UISplitViewController, displayModeForExpandingToProposedDisplayMode proposedDisplayMode: UISplitViewController.DisplayMode) -> UISplitViewController.DisplayMode {
  guard
    let primary = svc.viewControllers[0] as? EmbeddedTabBarController
  else { return .oneBesideSecondary }

  primary.popToRootViewController(animated: false)?.forEach {
    stackForExpanding.append($0)
  }

  return .oneBesideSecondary
}

public func splitViewControllerDidExpand(_ svc: UISplitViewController) {
  guard
    svc.viewControllers.count >= 2,
    let secondary = svc.viewControllers[1] as? UINavigationController
  else { return }

  stackForExpanding.forEach {
    secondary.pushViewController($0, animated: false)
  }
  stackForExpanding = []
}
|
由于 displayModeForExpandingToProposedDisplayMode 调用时无法获取到默认设置的 UINavigationController,我们可以使用一个数组来临时保存视图控制器的引用,当分栏视图控制器 Did Expand 时再压入。
重写 UINavigationController
上面的内容介绍了 AdaptiveNavigator 重写后的行为逻辑,为了配合 AdaptiveNavigator,我们需要对 UINavigationController 即 EmbeddedTabBarController 的部分方法进行重写。
显示模式
1
2
3
4
5
|
public enum NavigationMode {
  /// Used for integration with SplitView
  case embedded
  case alone
}
|
考虑到 iOS 平台和 iPadOS 平台行为的一致性,我们可以设置 EmbeddedTabBarController 显示模式,embedded 用于配合 AdaptiveNavigator 使用,alone 则用于无需 SplitView 时单独使用。
调整内置的 UITabBar
自定义 UITabBarController 的一大问题就在于需要手动设置 UITabBar的一些逻辑,本文仅简单对部分内容进行介绍,如有需求可能还需要自行探索。
 1
 2
 3
 4
 5
 6
 7
 8
 9
10
11
12
13
14
15
16
17
18
19
20
21
22
23
24
25
26
27
28
|
var offset: CGFloat {
  let device = UIDevice.current.userInterfaceIdiom
  switch device {
    case .phone:

      let screen = view.window?.windowScene?.screen ?? UIScreen()
      let screenWidth = screen.nativeBounds.width / screen.nativeScale

      if screenWidth < 400 {
        let orientation = UIDevice.current.orientation
        switch orientation {
          case .portrait:
            return 49
          case .landscapeLeft, .landscapeRight:
            return 32
          default:
            break
        }
      }

      return 49

    case .pad:
      return 50
    default:
      return 0
  }
}
|
 1
 2
 3
 4
 5
 6
 7
 8
 9
10
|
topConstraint = tabBar.topAnchor.constraint(equalTo: view.safeAreaLayoutGuide.bottomAnchor, constant: -offset)

guard let topConstraint else { return }

NSLayoutConstraint.activate([
  tabBar.leadingAnchor.constraint(equalTo: view.safeAreaLayoutGuide.leadingAnchor),
  tabBar.trailingAnchor.constraint(equalTo: view.trailingAnchor),
  topConstraint,
  tabBar.bottomAnchor.constraint(equalTo: view.bottomAnchor)
])
|
1
2
3
4
|
override public func viewWillTransition(to size: CGSize, with coordinator: UIViewControllerTransitionCoordinator) {
  super.viewWillTransition(to: size, with: coordinator)
  topConstraint?.constant = -offset
}
|
1
2
3
4
5
6
7
8
|
override public func viewWillLayoutSubviews() {
  super.viewWillLayoutSubviews()
  if countOfViewControllers == 1 {
    for viewController in tabBarViewControllers {
      viewController.additionalSafeAreaInsets = UIEdgeInsets(top: 0, left: 0, bottom: offset, right: 0)
    }
  }
}
|
- 调整子视图控制器安全区
- 本文逻辑基于只有当选项卡对应的第一级视图显示时,才显示选项卡栏,所以只对第一级视图的安全区进行调整
与 UITabBar 进一步配合
 1
 2
 3
 4
 5
 6
 7
 8
 9
10
|
@objc @MainActor public protocol EmbeddedTabBarControllerDelegate: NSObjectProtocol {
  @objc optional func tabBarController(
    _ tabBarController: EmbeddedTabBarController,
    shouldSelect viewController: UIViewController
  ) -> Bool
  @objc optional func tabBarController(
    _ tabBarController: EmbeddedTabBarController,
    didSelect viewController: UIViewController
  )
}
|
在这里,我们简单定义了两个代理方法,可以根据需要自行增加或者修改。
 1
 2
 3
 4
 5
 6
 7
 8
 9
10
11
12
13
14
15
16
17
18
19
20
21
22
23
24
|
public func tabBar(_ tabBar: UITabBar, didSelect item: UITabBarItem) {
  let viewController = tabBarViewControllers[tabBar.items?.firstIndex(of: item) ?? 0]

  if
    let tabBarDelegate = tabBarDelegate,
    tabBarDelegate.responds(to: #selector(tabBarDelegate.tabBarController(_:shouldSelect:)))
  {
    if tabBarDelegate.tabBarController?(self, shouldSelect: viewController) ?? true {
      replaceContent(with: viewController)
    } else {
      tabBar.selectedItem = (selectedIndex != nil) ? tabBar.items?[selectedIndex ?? 0] : nil
    }
  } else {
    replaceContent(with: viewController)
  }

  tabBarDelegate?.tabBarController?(self, didSelect: viewController)
}

func replaceContent(with viewController: UIViewController) {
  setViewControllers([viewController], animated: false)
  countOfViewControllers = 1
  selectedViewController = viewController
}
|
实现 UITabBar 代理。此处我们使用无动画的 setViewControllers 来实现设置选项卡栏的显示视图,并且设置计数器和辅助的属性。
 1
 2
 3
 4
 5
 6
 7
 8
 9
10
11
12
13
14
15
16
17
18
19
20
21
22
23
24
25
26
27
28
29
30
31
32
33
34
35
36
37
38
39
40
41
42
43
44
45
46
|
/// The currently selected view controller.
public var selectedViewController: UIViewController? {
  didSet {
    if let selectedViewController {
      guard let index = tabBarViewControllers.firstIndex(of: selectedViewController) else { return }
      tabBar.selectedItem = tabBar.items?[index]
    } else {
      tabBar.selectedItem = nil
    }
  }
}

/// Index of the currently selected view controller.
public var selectedIndex: Int? {
  get {
    guard
      let selectedViewController,
      let index = tabBarViewControllers.firstIndex(of: selectedViewController)
    else { return nil }
    return index
  }
  set {
    if let newValue {
      guard newValue < tabBarViewControllers.count else { return }
      selectedViewController = tabBarViewControllers[newValue]
      replaceWithSelectedViewController()
    } else {
      selectedViewController = nil
    }
  }
}

private func replaceWithSelectedViewController() {
  if let selectedViewController = selectedViewController {
    replaceContent(with: selectedViewController)
  }
}

/// The view controllers displayed by the tab bar.
public var tabBarViewControllers: [UIViewController] = [] {
  didSet {
    tabBar.items = tabBarViewControllers.map {
      $0.tabBarItem ?? UITabBarItem(title: $0.title, image: nil, tag: 0)
    }
  }
}
|
- 在这里我们定义了一些辅助属性,可以根据需要进行更改。
与 Navigator 进行配合
 1
 2
 3
 4
 5
 6
 7
 8
 9
10
11
12
13
|
override func pushViewController(_ viewController: UIViewController, animated: Bool) {
  if navigationMode == .embedded {
    navigator?.showDetailViewController(viewController, sender: self)
  } else {
    countOfViewControllers += 1
    super.pushViewController(viewController, animated: animated)
  }
}

func rawPushViewController(_ viewController: UIViewController, animated: Bool) {
  countOfViewControllers += 1
  super.pushViewController(viewController, animated: animated)
}
|
- 使用 countOfViewControllers 来记录选项卡栏的视图的逻辑层级,视图 push 时增加 1,pop 则减少 1
- 重写 pushViewController 以便调用(如UIHostingController 中 SwiftUI 视图的 NavigationLink 的默认行为)
- 用 rawPushViewController 保留原来的 push 逻辑
 1
 2
 3
 4
 5
 6
 7
 8
 9
10
11
12
|
public func navigationController(_ navigationController: UINavigationController, didShow viewController: UIViewController, animated: Bool) {
  if
    let poppedViewController = navigationController.transitionCoordinator?.viewController(forKey: .from),
     !navigationController.viewControllers.contains(poppedViewController) {
    countOfViewControllers -= 1
  }
}

override func popToRootViewController(animated: Bool) -> [UIViewController]? {
  countOfViewControllers = 1
  return super.popToRootViewController(animated: animated)
}
|
- 在这里,我们重写方法以实现在弹出时减少计数以及弹出至根视图时重置计数器
 1
 2
 3
 4
 5
 6
 7
 8
 9
10
11
12
13
14
15
16
17
18
19
20
21
22
23
24
25
26
27
|
var countOfViewControllers: Int = 0 {
  didSet {
    if countOfViewControllers <= 1 {
      showTabBar()
    } else {
      hideTabBar()
    }
  }
}

func hideTabBar() {
  if isTabBarHidden { return }
  isTabBarHidden = true

  UIView.animate(withDuration: 0.25) { [unowned self] in
    tabBar.alpha = 0
  }
}

func showTabBar() {
  if !isTabBarHidden { return }
  isTabBarHidden = false

  UIView.animate(withDuration: 0.25) { [unowned self] in
    tabBar.alpha = 1
  }
}
|
- 观察 countOfViewControllers 以实现显示和隐藏选项卡栏
- 通过上述代码简单完成了显示和隐藏选项卡栏的动画,可以根据需要自行更改显示的效果